As well as printing postage, your device uses other ways to print and feed mail. Tap Print Mode in the Print on Envelopes screen to see the available options.
– Date and Time Stamp – Print just the date and time. Your device will not print any postage.
– Graphic only – Print a graphic. Your device will not charge you for printing a graphic only.
– Postage printing – Postage printing is the default mode for printing mail.
– Seal only – Seal your envelopes. Your device will not print when you select Seal Only.
Check the ink level to ensure you have enough ink in your device. To do this simply:
1. Tap the Settings icon in the global toolbar.
2. Scroll down and tap Envelope Printer Maintenance.
3. View the level of remaining ink.
4. Tap Done to exit the screen.
Watch this video to learn how to replace the ink cartridge for the franking machine.
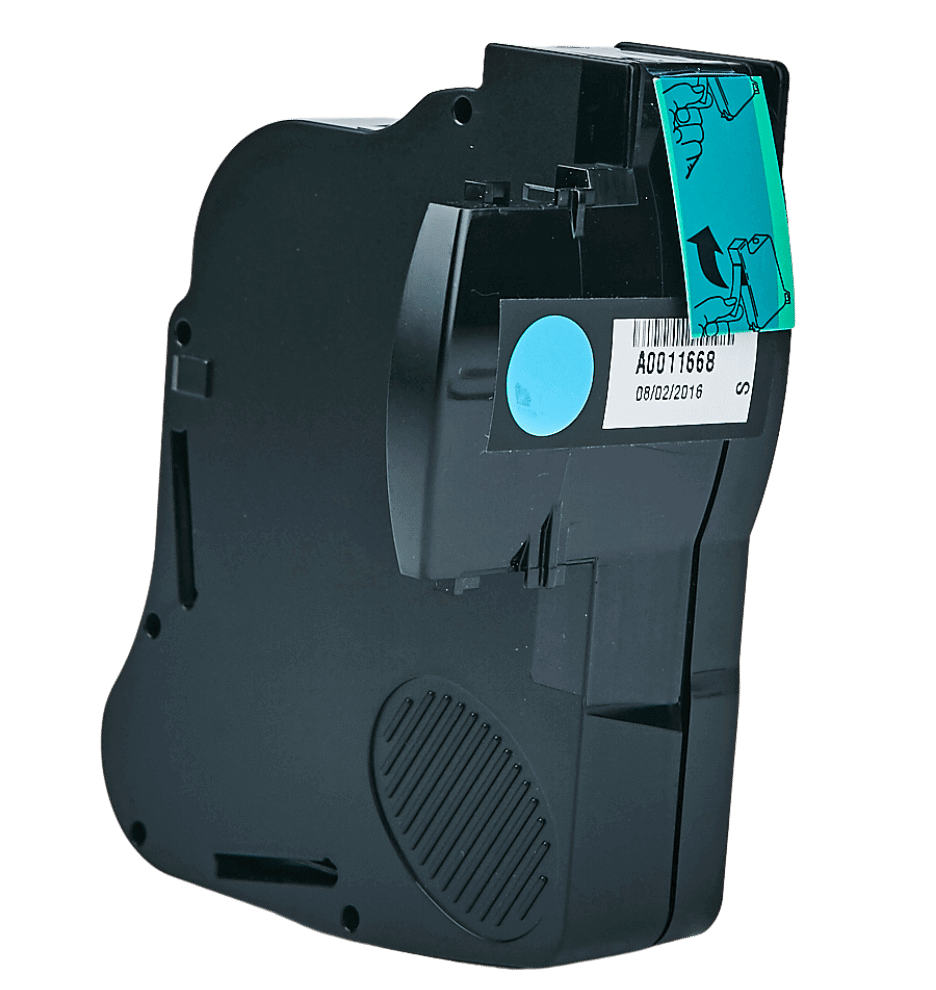
Follow these steps to replace the ink cartridge:
1. Tap the Settings icon in the global toolbar.
2. Scroll down and tap Envelope Printer Maintenance. The Envelope Printer Maintenance screen displays.
3. Tap Install Ink.
4. Lift the cover. The ink cartridge moves to the front position.
5. Remove the ink cartridge as shown on the label next to the cartridge holder.
6. Insert the new ink cartridge and close the cover. The cartridge re-positions itself and the Envelope Printer Maintenance screen re-displays.
7. Perform a print test to be sure that you are getting a good test print pattern.
Important: Only use Mailcoms Royal Mail approved franking machine ink cartridges for this franking machine. Using Non-Mailcoms or third-party ink cartridges from alternative suppliers can cause damage to your franking machine.
If you need further assistance, please contact us on 01543 572 776.
Watch this video to learn how to replace the printhead on your franking machine.
To replace the printhead, please follow the below instructions:
1. Tap the Settings (gear) icon in the global toolbar.
2. Scroll down and tap Envelope Printer Maintenance. The Envelope Printer Maintenance screen displays.
3. Tap Install Printhead.
4. Lift the cover; the ink cartridge moves to the front position.
5. Flip the ink cartridge guard open.
6. Remove the ink cartridge as shown on the label to the right of the cartridge holder.
7. Squeeze the two grey tabs on either side of the printhead.

8. Lift and tilt the printhead gently to the right.

9. Pull the old printhead up and out of the holder.

10. Note the location of the plastic alignment tabs and the orientation of the printhead so that you can install the new printhead correctly.

11. Examine the printhead holder and find the location of the lower printhead alignment slots.

12. Insert the printhead by squeezing the tabs on either side of the printhead and sliding the plastic alignment pins into the lower slot of the printhead holder.

13. Gently push the printhead into place until it snaps into position.
14. Install the ink cartridge (see the label to the right of the cartridge holder).
15. Rotate the guard back to the closed position.
16. Close the cover; the ink cartridge moves back to the original position.
17. Tap Done.
18. Print a print test pattern to be sure that your printhead is functioning properly.
Watch this video to learn how to perform a Print Maintenance Cycle on your franking machine.
To perform a Print Maintenance Cycle, please follow the below instructions:
1. From the home screen, click the settings button (cog) in the top right corner of the machine.
2. Scroll down and press “Envelope Printer Maintenance”.
3. Select the option to “Clean printhead”.
4. Click the box under the print example to “Clean printhead”.
5. The machine will now make some noise as it cleans the print system.
6. The machine will prompt you to run through a test pattern. This will go through the machine like a letter so make sure you have some paper or a label handy.
7. Once the test pattern has been printed, compare this to the examples on the screen.
8. If the print is poor, press “Clean printhead” once again. If the print is good press “Done.
9. Press “Done” once again to return to the home screen.
Issue
The machine is not printing well. Print may be streaky, fuzzy, spotty, partial, or missing completely.
Cause
There is a problem with the print head or the ink cartridge.
Resolution
1. Tap the Settings (gear) icon in the global toolbar.
2. Scroll down to the Envelope Printer Settings section.
3. Tap Envelope Printer Maintenance.
4. Tap Print Test Pattern.
5. When the display says Print Test Pattern?, feed an envelope or tape sheet into the machine.
6. Compare the printed test pattern to the ones on the screen.
7. If If it looks like the good example:
a. Tap Done.
b. Tap Home to return to the Home screen.
8. If it looks like the bad example:
a. Tap Clean Print Nozzle.
b. After cleaning, you will be prompted to print another test pattern.
If you need further assistance, please contact us on 01543 572 776.
Printing a test pattern lets you see if the print head is functioning properly or if you have enough ink in the cartridge.
1. Tap the Settings icon in the toolbar.
2. Scroll down and tap Envelope Printer Maintenance. The Envelope Printer Maintenance screen displays.
3. Tap Print Test Pattern.
4. When the message Print a test pattern? displays, feed an envelope through the machine.
5. Examine the pattern printed on the envelope:
– Tap Done if the lines are unbroken and match the “Good” test pattern shown on the display.
– Tap Clean Print Head if the test pattern has missing or incomplete lines.
– Once the cleaning operation completes, you must print another test pattern.
– If this new pattern still has broken or missing lines, you may need to replace the ink cartridge.
Good test print
Bad test print
Important: If you see no improvement in print quality, do not repeat the cleaning, as cleaning the print nozzles consumes ink.
If you need further assistance, please contact us on 01543 572 776.
When feeding mail:
1. For your first envelope, hold the far edge of the envelope against the back wall of the feeder.
2. Slide the envelope into the feeder until you feel it touch the rollers. You will hear the feeder motor begin. Do not release the envelope until the feeder grabs it to pull it through the machine.
3. You will hear the feeder motor continue to run for about 5 seconds once it prints postage on the envelope on the first envelope.
4. Continue to feed envelopes, one at a time, simultaneously pressing the edge of each envelope against the back wall of the feeder and into the feeder until it touches the rollers.
– Make sure the envelopes fully exit the feeder and do not pile up on the edge of the feeder. If you are using a stacker, you may need to extend the stacker tray so that the envelopes exit the feeder completely.
What to avoid when feeding mail:
If you don’t hold the envelope against the back wall it can feed in crooked or skewed. A skewed envelope can either exit the machine with no postage applied or cause a jam. The message Clear Paper Jam appears in the display.
Even a minor skew that may be difficult to see can cause a jam.
1. To clear the jam turn the paper jam lever clockwise and remove the envelope.
2. Turn the jam lever back to the locked position.
3. Continue printing, sliding the first envelope in until it touches the rollers and you hear the motor start.
– Make sure that once the feeder grabs the envelope, you do not try to remove it and then re-feed it as this will result in a Clear Paper Jam message.
Preventive action:
To prevent envelopes from getting stuck in the transport deck:
– Use a can of non-flammable compressed air and blow on the feed deck on the left side and work toward the transport deck on the right side. Make sure and remove all the dust and debris.
Issue
A mail piece has stopped inside the franking machine and the message “Clear Paper jam” displays.
Cause
A mail piece has stopped inside of the franking machine.
Resolution – Solution 1 – Remove the mail piece from the transport deck
1. Turn the transport release lever clockwise to the released position.
2. Carefully pull the envelope out toward the right.
Resolution – Solution 2 – If you remove the mail piece and the franking machine continues to display “Clear Paper jam”, reboot the franking machine
1. Turn the transport release lever counterclockwise to the home position.
2. Turn the power off by holding the power button for 5 seconds, the power button will darken.
3. Wait for the display to turn off.
4. Wait one minute then turn the power back on.
If you need further assistance, please contact us on 01543 572 776.
Your device can be used to send various items of mail via First Class mail. First Class is an economical way to send mail pieces through Royal Mail.
1. Tap Envelope Printing on the Home screen.
2. Tap Account on the left side of the screen and select an account.
3. Tap Class.
4. Tap Start Over to display a list of all the available classes.
5. Tap Royal Mail First Class.
6. Tap Letter.
7. Tap Apply.
8. Place the envelope on the scale. The weight appears in the weight button on the screen.
9. Place the envelope on the feed deck and the device automatically feeds the envelope and prints the postage.
Note: If you have previously printed any envelopes, you may get a message that transactions are being uploaded. Once the upload completes, you see the message “Transaction upload status, Upload success” with a tick. Tap the tick.
This procedure can be used when you know the weight of a mail piece and are not using the integrated weighing platform.
1. Tap Envelope Printing on the Home screen.
2. Tap the weight button.
3. Tap the Manual button.
4. Tap the kg option and enter the kilograms.
5. Tap the grams option and enter the grams.
6. Tap Apply.
7. Tap Class on the Envelope Printing screen. If necessary, select Start Over to display all of the class options.
8. Select the class.
9. Select the type of package or envelope.
10. Select any special services required.
11. Tap Apply.
12. Feed the envelope through the machine.
This procedure describes how to seal envelopes whether you are printing postage on the envelopes or only sealing the envelopes (no-postage). If you are only sealing envelopes, refer to Sealing the envelope only – (bypass all printing) below.
1. Check the level of sealant in the moistener tank and add more if required. Refer to Filling the moistener tank below for detailed steps.
2. When feeding an envelope be sure to slide the envelope flap under the edge of the feed deck, so the moistener can wet the flap.
Note: If the moistener tank is full and your envelopes are still not sealing correctly, clean or replace the moistener brush and wick. Refer to Cleaning the moistener brush and wick assembly below for detailed steps.
Refer to Sealing envelopes above for the correct way of feeding envelopes to ensure they are sealed properly.
1. Tap Envelope Printing on the Home screen.
2. Tap Print Mode on the lower left side of the Envelope Printing screen. You may have to swipe up on the screen to see this option.
3. Select Seal Only.
4. Tap Apply.
5. Place the first envelope face up, flap down into the feeder. Be sure to slide the envelope flap under the edge of the feed deck.
Sealing issues can be caused by:
– not enough sealant in the moistener tank
– not placing the envelope correctly on the feed deck
– problems with the moistener brush or wick
Use this checklist to avoid envelope sealing issues:
– Check the level of sealant in the moistener tank and add more if required.
– When feeding an envelope be sure to slide the envelope flap under the edge of the feed deck. Otherwise, the moistener cannot wet the flap.
– If the moistener tank is full, and your envelopes are still not sealing correctly, clean or replace your moistener brush and wick.
Issue
The franking machine is not sealing or only partially sealing envelopes.
Cause
Sealing issues are usually caused by inadequate sealant in the moistener tank, or problems with the wick or brush in the moistener.
Resolution
1. Be sure to slide the envelope flap under the edge of the feed deck. Otherwise, the moistener cannot wet the flap.
2. Check the sealant level by looking at the sight glass on the left side of the moistener tank.
- If the sealant level is low, add sealing solution until it reaches the bottom of the fill hole. Do not overfill the moistener tank.
- If the tank was empty, allow 30 minutes for the moistener brush and wick to get completely wet before trying to use the moistener.
3. Check if the moistener brush is dry. If it is:
- Make sure that the white thumbscrews on the bottom of the sealer are tight.
- Try wetting the moistener brush manually.
- Make sure that the brush is making contact with the wick. You may need to lift the wick up slightly to make sure that it is making contact with the brush.
Note: If the brush dries out quickly, replace the moistener wick.
4. Check if the moistener brush is dirty. If it is, remove the moistener brush, clean it in plain water, and rinse thoroughly.
If you need further assistance, please contact us on 01543 572 776.
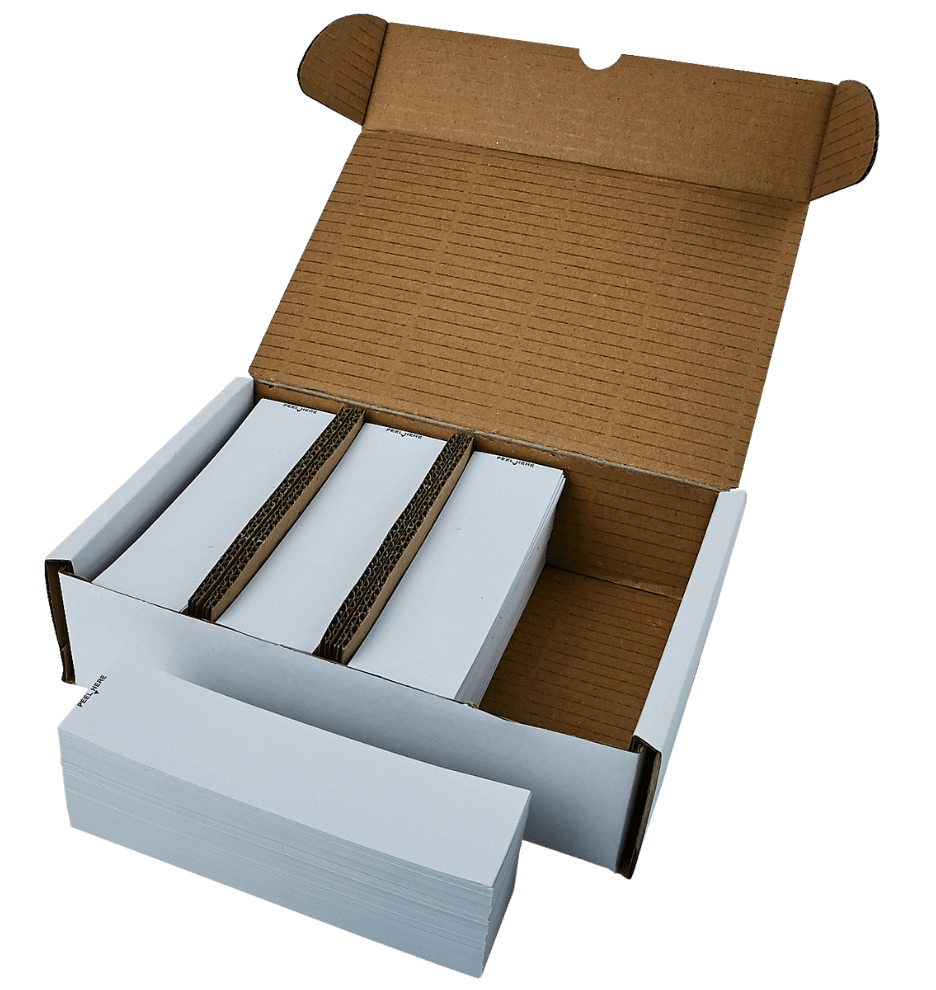
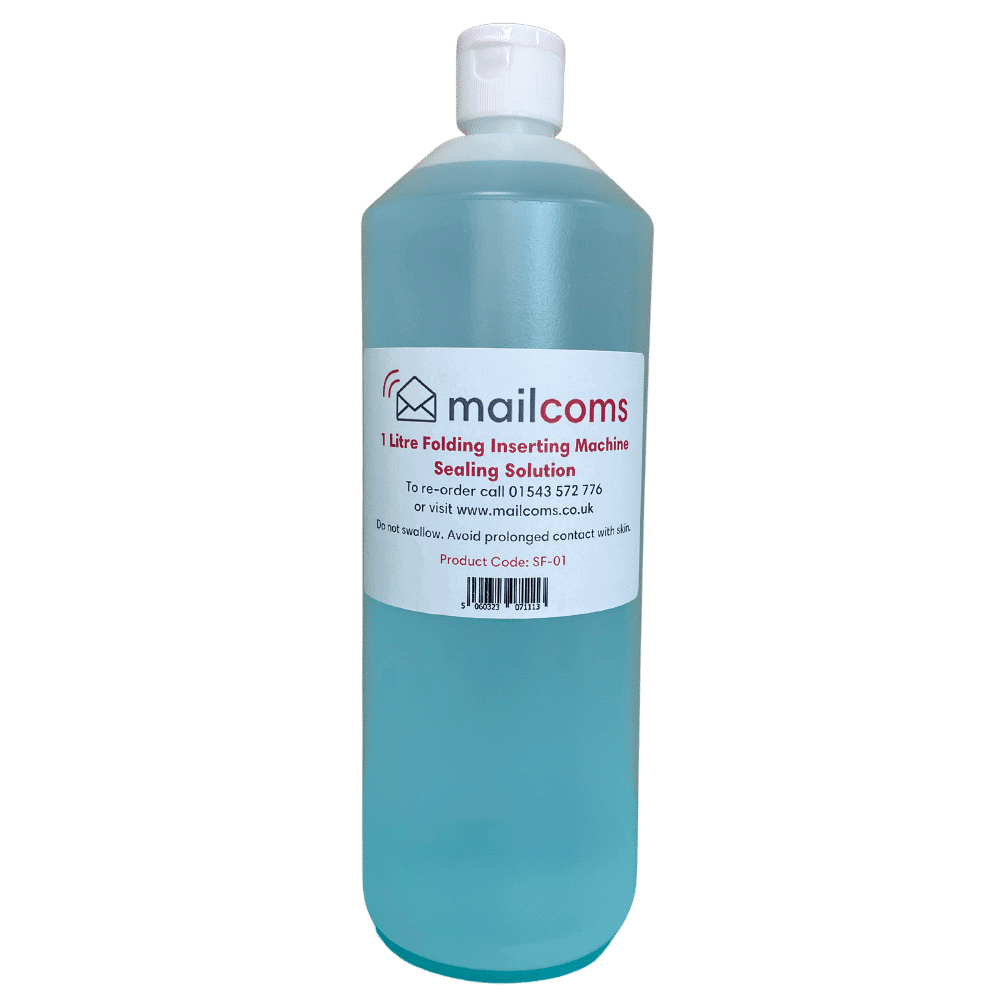
Your franking machine will periodically need refills of Sealing Solution in order to seal envelopes. Follow these steps to fill the moistener tank.
1. Check the level of sealing solution in the moistener tank.
filling-moistener-96

2. Add enough E-Z Seal® Sealing Solution to bring the sealant level up to the bottom of the fill hole. Do not overfill the tank.
3. If the tank is empty, allow 30 minutes for the moistener brush and wick to get completely saturated.
If you need further assistance, please contact us on 01543 572 776.
If the moistener tank is full and your envelopes are not being sealed properly, clean the moistener brush and wick.
1. Unscrew the plastic thumbscrew under the moistener base.

2. Lift the moistener brush assembly off the top of the moistener base.

3. Turn the assembly over and slide the moistener brush out of the holder.

4. Locate the wick (with metal grate) on moistener base.

5. Remove the metal grate and wick from the moistener base.

6. Clean the brush and wick with water and rinse thoroughly.
7. Place the wick back in the metal grate and replace in the moistener base.
8. Replace the moistener brush in the holder (see step 3).
9. Replace the moistener brush assembly on top of the moistener base and secure with the plastic thumbscrew.
1. Tap Envelope Printing on the Home screen to open the Envelope Printing screen.
This screen is the starting point for printing postage on an envelope or tape. It also allows you to change what you print on the envelope.

On this screen, you can:
1. Tap Class to view the class and any extra services.
2. Select an account by tapping Account.
3. Create or select a Preset.
4. View the balance of funds you have remaining in your device.
5. Preview or add graphics.
6. View the total postage amount.
7. Tap the date to view the date options.
8. Tap the weight icon to view the weighing options (enter weight manually or using a scale).
9. Tap Print Mode to access the Print mode screen. This provides you with different printing modes such as adding graphics to your envelope or adding more postage. You can also choose to only seal envelopes without printing any postage.
10. Tap on the option you want to select the mode.
– Date and Time Stamp
– Graphic Only
– Postage Printing – printing postage on an envelope is the default mode.
– Seal Only – bypass all printing.
With the you can print postage with a date in the future. If you miss today’s mail pickup, you can print your postage with a future date.
1. Tap Envelope Printing on the Home screen.
2. Tap the date on the Envelope Printing screen. The calendar displays.
3. Tap Tomorrow or Another Date on the right-hand side of the calendar, depending on the date you wish to print.
4. Tap Apply when you see the future date highlighted on the calendar.
5. The Envelope Printing screen displays the future date.
6. Place your envelope on the deck to automatically print your postage with a future date.
Note: The date on the postage should match the date when your mail goes to the post office. Your machine automatically advances the printed date on the franking stamp (as well as its internally held date) when the system time reaches 5:00 PM. This time cannot be changed.
1. Tap Envelope Printing on the Home screen.
2. Tap Print Mode (you may have to scroll down to see this).
3. Select Date and Time Stamp.
4. Tap Apply.
5. Feed the envelope through the machine.
1. Tap Envelope Printing on the Home screen.
2. Tap Print Mode.
3. Select Graphic Only.
4. Tap Apply.
5. Tap the Graphics button.
6. Select the Graphics button and then select your graphic.
7. Confirm with Apply.
8. Print the graphic on the envelope or tape sheet.
The funds report can provide the following information about Envelope Printing franking machine:
- Used: The total amount used over the lifetime of the franking machine.
- Available: The amount currently available to print.
- Total Pieces: The total number of mail pieces run over the lifetime of the franking machine.
- Control Sum: The control sum is the total of the amount used and available.
- Batch Count: The current Batch Count.
- Batch Value: The current Batch Total.
- PBI Serial No.: The serial number of the franking machine.
- The date and time the report was printed.
To print the funds report:
1. Tap Envelope Printing on the Home screen
2. Tap the piece count in the upper right.
3. Tap Print Report.
4. Tap Envelope Printer.
5. Feed an envelope through the machine.
1. Tap Envelope Printing on the Home screen.
2. Tap the Pieces button in the Mail screen.
3. Tap Print Report.
4. Tap Envelope Printer.
5. Feed the envelope through the machine.
6. A funds report prints showing the total number of pieces sent.
Print Parcel Shipping labels to get the best pricing for Royal Mail or ParcelForce® parcel services.
1. Tap “Parcel Shipping” on the Home screen.
2. Tap “Royal Mail and ParcelForce”.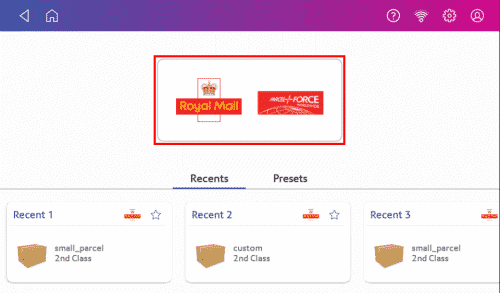
3. Add the sender address. Use the address book icon or enter it manually.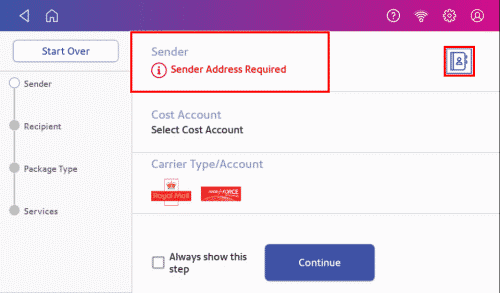
4. Select a cost account, if enabled. If this field contains an account, check the account is correct.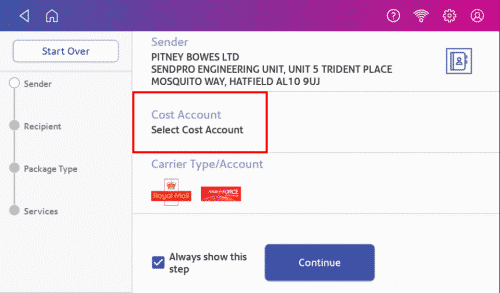
5. Tap “Continue”.
6. Tap the “Address” icon to select the recipient address from the address book. Alternatively, manually enter a postcode and scroll to the desired address. Tick the “Save contact” box to save the address to the address book.
7. Tap “Continue”.
8. Enter the size of the parcel in centimetres within the Dimensions boxes.
9. Tap the “Weight” button.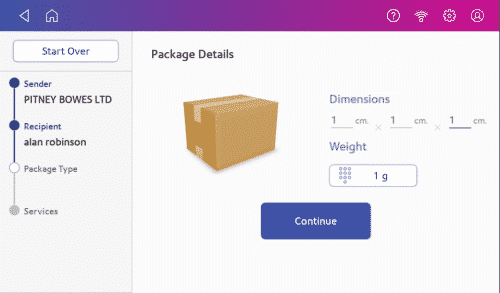
10. There are two options to now choose:
a. Tap the “Scale” radio button, then place the parcel on the scale. Tap “Apply”, then “Continue” or
b. Manually enter the weight of the parcel if you know the weight. Tap “Apply”, then “Continue”.
11. Tap the service you wish to use, in this example, “1st Class”.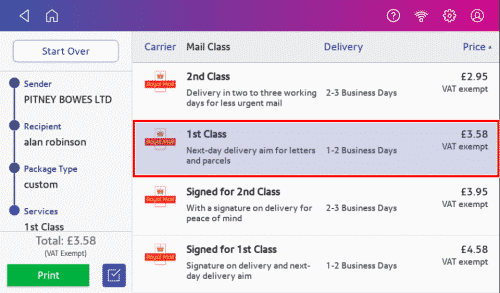
12. Tap “Extra Services” if required. If you are not adding any special services, go to step 15.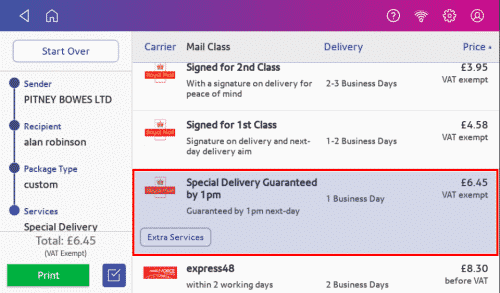
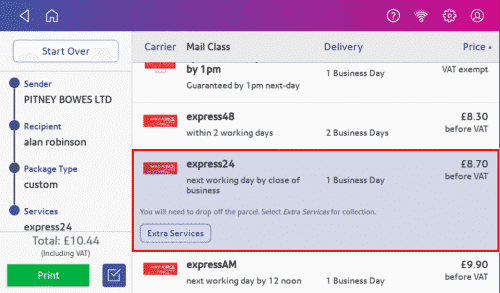
13. Tap the desired extra service.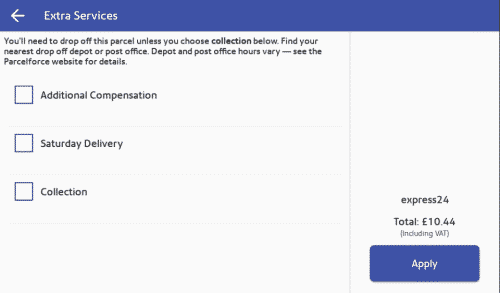
14. Tap “Apply” to confirm the extra services.
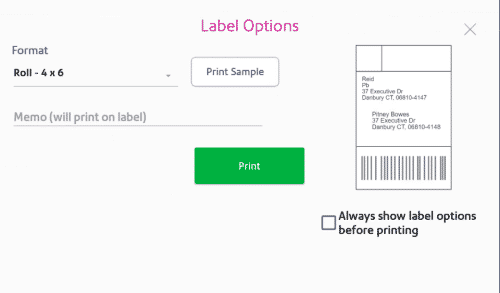
15. Tap the “Label Options” icon to add a memo onto the label. Enter further information about your parcel, if prompted. When complete, tap “Continue”. Alternatively, tap “Print” to print the label.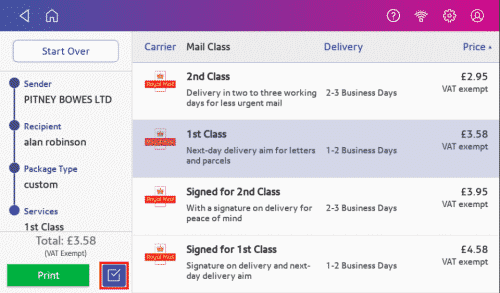
Print a Parcel Shipping label from an address you have selected in the address book.
1. Tap “Address Book” in the application drawer at the bottom of the Home screen.
2. Find the address you want to use for your label.
3. Tap the address to open it.
4. Tap the “Print shipping Label” button at the bottom right side of the screen.
5. Follow the steps for printing a Parcel Shipping label.
If a label does not print correctly, you can print it again.
1. Tap “Shipping History” in the application drawer at the bottom of the Home screen.
2. All of the Parcel Shipping labels appear by date. The latest date appears. The Date column shows the date you purchased the postage.
3. Find your label in the list.
4. Tap the label to open the details screen.
5. Tap “Reprint Label”.
6. Tap the tick box to confirm you will not use the label multiple times.
7. Tap “Reprint”.
Void a Parcel Shipping label to cancel it. The funds will be re-credited to your Purchase Power account.
You have up to fourteen days after you print the label to void it.
1. Tap “Shipping History” in the application drawer at the bottom of the Home screen.
2. All of the Parcel Shipping labels appear by date. The latest date appears first in the list.
3. Find your label in the list.
4. Tap the label to open the details screen.
5. Tap “Void Label”.
6. Tap the tick box to confirm you accept the terms and conditions.
7. Tap “Continue”.
8. Press the back button twice to return to the Home screen.
Email a tracking number for each new Parcel Shipping label automatically.
1. Tap “Settings” on the toolbar.
2. Tap “Automated Emails” in Shipping Settings.
3. Tap the “Send tracking emails to recipients” and “Send tracking emails to myself (or the sender)” tick boxes, as desired.
4. (Optional) Enter the subject in the Customize the email subject line field.
5. Tap the “back arrow” to return to the previous screen.
Occasionally you may want to or need to cancel a parcel label that has already been printed. In this case, please follow the below procedure.
1. Select “Home”.
2. Click on “Shipping History”.
3. Select “Label”.
4. Select “Void label.
5. Check the box on the pop up notice.
6. Select “Continue”.
7. We need to make sure the label has been cancelled. Select “Home”.
8. Click on “Shipping History”.
9. The status should read “Refund Requested”.
If you get a bad quality test print pattern, clean your printhead nozzles to try to correct the problem.
1. Tap the “Settings icon” on the toolbar.
2. Scroll down to the Envelope Printer Settings section.
3. Tap the “Envelope Printer Maintenance” button.
4. Tap “Clean Printhead”.
5. Once the cleaning operation completes, the device prompts you to print another test pattern. If the new pattern still has broken or missing lines, you may need to replace the ink cartridge or printhead.
Watch this video to learn how to frank a letter with your franking machine.
To frank a letter, please follow the below instructions:
1. To get started press into “envelope printing”.
2. Select the class box on the right-hand side.
3. Press “Start over”.
4. Select which service you require from the list.
5. If using “First” or “Second” class mail, select the size using you Mailcoms PIP ruler or if you required RM signed for select this first.
6. Once you have selected your service and size click “apply”.
7. Place your item on the scale to confirm the correct price is being shown.
8. If all is correct, the machine will display ready to print.
9. Feed your envelope or label through the machine as shown.
10. If you have printed on a label, affix to your item and it is ready to be sent.
Watch this video to learn how to process International items with your franking machine.
To process International items, please follow the below instructions:
1. From the Home Screen, Select the “Envelope Printing” option.
2. Select the class box on the right-hand side.
3. Press “Start over”.
4. Select “International” from the list.
5. Choose the service you require from the list. Please Note: All countries offer different services. If the country does not appear in the option selected, try another service.
6.Select the size of your item, using your Mailcoms PIP ruler.
7. Enter the destination of your item using the keyboard on screen.
8. As stated above if the country does not appear when typing in, go back and select a different service.
9. Once you have selected the destination country, the machine will ask if you would like additional compensation. IF you require this tick the box.
10. Press “Apply”.
11. Place your item on the scale to confirm the correct price is being shown.
12. If all is correct, the machine will display ready to print.
13. Feed your envelope or label through the machine as shown.
14. If you have printed on a label, affix to your item and it is ready to be sent.