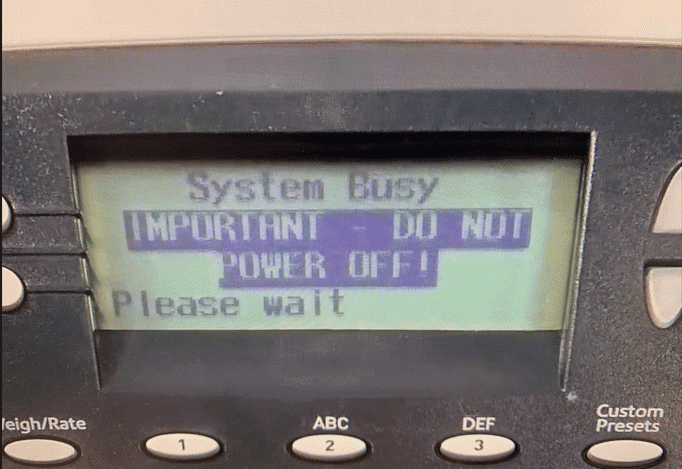
We have recently been informed that there is a potential fatal error code 2E17 that is coming up on some franking machine models. If you currently use any of these models of franking machines, please read below.
The 2E17 fatal error is caused when the Tracking Services archive in the Flash Memory gets corrupted.
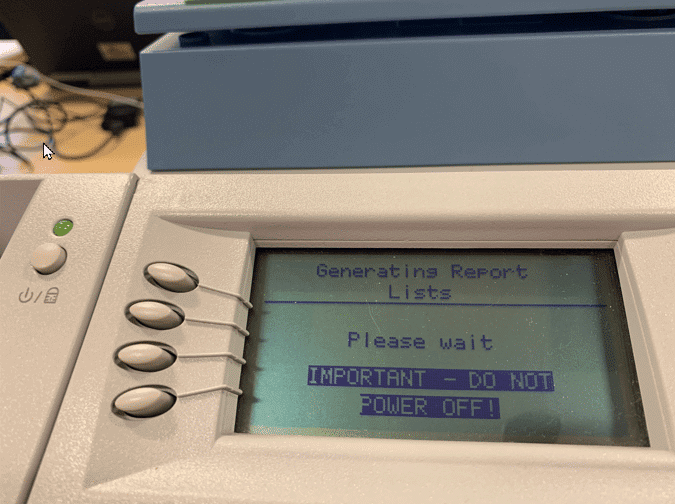
Your machine will display an error message informing you to not disconnect from the power. It is vital that you DO NOT POWER OFF the franking machine during this upload and immediately contact Mailcoms so that we can assist with next steps. Please note this message should disappear once the meter has updated which can be between 1-5 minutes but if it is best practice to contact us in the first instance so we can assist.
Please contact us on any of the details below:
Call: 01543 572 776
Email: info@mailcoms.co.uk
Live Chat
If you decide to ignore this warning on the franking machine screen during the Flash Memory upload, then the franking machine will become unrecoverable.
This may result in the loss of all data stored within the franking machine which will also include any postage funds should you fail to adhere to the instruction message.
Please see photos below for the different franking machine models, showing the warning not to power off. This message will appear while the upload is being processed and if you power off during the upload, then the 2E17 error appears.
Here are the machine screens that appear during the Flash Memory upload:
Mailbase Lite, Mailbase & Mailbase Pro Franking Machines:
Mailbase+ & Mailbase Speed Franking Machines:
The franking machine occasionally show a DE Error Code. These issues tend to be due to connection issues and can all be resolved easily. Below you will be able to find out what the DE error codes mean and how to potentially resolve the issue. See if we can help you below.
DE Error Codes
DE00 – General Task Exception Error
DE01 – GFX_VALIDATE_ERROR, GFX file validation error after download
DE02 – GFX_INSTALL_ERROR, GFX file installation error after download
DE03 – XML_ATTR_NUM_ERR, Invalid number of attributes
DE04 – XML_ATTR_NAME_ERR, Invalid attribute name
DE05 – XML_STRUC_ERR, Invalid XMS structure
DE06 – XML_REPLY_ERR, XML reply error
DE07 – XML_PARSE_ERR, XML parse error
DE08 – MEMORY_ERR, No memory
DE09 – NULL_ARGUMENT, NULL argument
DE0A – ADD_DEVICE_ERR, Failed to add device
DE0B – NULL_PTR, NULL pointer
DE0C – INVALID_PTR, INVALID pointer
DE0D – IT_MSG_ERR, Intertask message error
DE0E – INVALID_MSG, Invalid message
DE0F – INVALID_URL, Invalid URL
DE10 – NO_RATE_MGR, No rate manager found
DE11 – SOCKET_CREATE_ERR, Failed to establish socket
DE12 – SOCKET_CLOSE_ERR, Failed to establish socket
DE13 – DNS_HOST_ERR, Unable to resolve DNS host
DE14 – SRV_CONN_ERR, Server connection error
DE15 – DATA_TX_ERR, Failed to send data
DE16 – DATA_RX_ERR, Failed to receive data
DE17 – INVALID_UPDATE_TYPE, Invalid update type
DE18 – UNDEFINED_UPDATE_TYPE, Undefined update type
DE19 – FTPC_OPEN_ERR, Failed to open FTP session
DE1A – FTPC_LOGIN_ERR, Failed to login FTP session
DE1B – FTPC_CHDIR_ERR, Failed to change directory
DE1C – FTPC_TYPE_ERR, Failed to change transfer type (binary)
DE1D – FTPC_CLOSE_ERR, Failed to close FTP session
DE1E – FTPC_TIME_OUT, FTP session Timed out
What they mean
DE error codes in general means a connection error has occurred. It can occur when you are trying to connect with the Data Centre. It could be caused by any of these conditions:
1. The Data Centre is not set up to communicate with your franking machine.
2. There is some other type of network problem.
3. If using PC Meter Connect, it might not be connected or isn’t working properly.
Resolution
To resolve this issue, these are some of the things to consider:
1. Is this your first postage refill? If so, contact Mailcoms to make sure your franking machine is linked to your postage account.
2. There may be a network communication problem. Check your modem, router and other network connections.
3. Have you reached your credit limit? Do you have funds available to download?
4. If using PC Meter Connect software, make sure you have the most current version. Check to see if your USB cable is connected. If you want to try an analogue line instead of PC Meter Connect, make sure the USB cable is disconnected BEFORE you reboot your system.
5. Reboot your system. If this fails, perform a complete shutdown of the machine and reboot your system after three minutes.
The franking machine may occasionally show a printer error code. These error codes tend to be due to printer issues. As a result your franking machine will not be printing correctly and it may show an error code like the ones you see below. Below you will be able to find out what the printer error codes mean and how to resolve the issue. See if we can help you below.
Printer Error Codes
0102, 0104, 0106, 0110, 0112, 0116, 0306, 0308, 0309, 2305, 2306, 2307, 2308, 2309, 2400, 2401, 2444, 2446, 2447, 2503, 2507, 2518, 24A1, 24A2, 24A3, 24A4, 24A5, 030D, 0324, 0325, 0326, 0327, 0328, 0329, 0802, 2304, 2304, 010E, 030D, 030E, 032A, or 032B.
Resolution
You may be able to clear the error by restarting your franking machine and cleaning the print head.
Follow these steps for a safe restart:
1. Unplug the power cord
2. Wait one to three minutes
3. Plug the power cord back in, ensuring that it is plugged directly into a wall outlet
If the error returns after restarting your franking machine, follow these steps to clean the print head:
1. Remove the scale
2. Open the ink door
3. Select Change Ink Tank
4. Once the printer carriage has moved to the front position, open the green latch
5. Remove the ink tank
6. Pinch the grey levers together, and remove the print head
7. Using a link free cloth, remove any excess ink, and wipe the print head
8. Carefully remove any ink that is on the gold-colored print head contacts on the meter
9. Reinstall the print head, making sure the grey levers click in place
10. Reinstall the ink tank
11. Close the ink door
12. Reinstall the scale
13. If the issue is unresolved after following these steps, contact customer support. Have your model number ready.
If your franking machine displays a “error 7”, “error 0007”, “error 11” or “error 0011” when trying to add funds to your franking machine then this means the franking machine postage account has been locked. This is preventing you from adding postage. A hold may be placed due to a problem with the account, for non-payment, or to restrict franking machine refills to specific users.
To solve this problem you will need to speak with one of our team members who will be happy to assist you.
Issue
The franking machine displays error code 2442 or 2443, and may not print.
Cause
This error usually occurs when the latch that locks the ink cartridge in place is not inserted properly.
Resolution
1. Remove the scale from the top of the franking machine.
2. Lift the ink cartridge cover.
3. Select “Replace Ink Tank”. The ink cartridge moves forward.
4. The green latch locks the grey ink cartridge cover down into a slot into the print head. Check that the green latch locks in the correct position.
5. Close the lid, and the cartridge moves back into position.
6. The franking machine confirms when the cartridge installs, select “Continue”.
7. Replace the scale, ensuring that it reseats correctly (on the Home screen, Man Wt gets replaced by SCALE when the scale is recognised by the franking machine).
8. If the error message does not clear, restart the franking machine. Follow these steps to restart safely:
a. Unplug the power cord.
b. Wait one to three minutes.
c. Plug the power cord back in, ensuring that it plugs directly into a wall outlet.
Issue
The franking machine displays Error 104 when trying to add postage.
Cause
You must add postage in multiples of £50.
Resolution
Press the “Clear” key until the home screen is displayed. Then follow these steps to add postage to your franking machine:
1. Press the “Refill Postage” key. The display shows the postage funds available in the franking machine.
2. Select “Add Another Amount”.
3. Select an amount that is a “multiple of £50”, then select “Continue”.
4. Press “Enter” to confirm the amount.
5. The machine will connect to Pitney Bowes and displays Connecting, Processing and Adding Postage.
6. You will be prompted to print a receipt – confirm with either the “Yes” or “No” button.
7. The franking machine will check for any pending downloads, for instance new rates or software updates. Follow any prompts to download and install any updates.
8. Once the process is complete, the franking machine will return to the Home screen.
Issue
Your franking machine displays the message “Missing Graphic”
Cause
Your franking machine is missing one or more graphic files.
Resolution
1. Ensure the franking machine is connected to either your network if using a wired or wireless connection, your PC if using PC meter connect or an analogue phone line.
2. Remove the power lead and wait ten seconds. The display shuts down.
3. Next, replace the power lead.
4. Once the franking machine initialises, press the “Refill Postage” button.
5. Select “Check PbP Balance”.
6. The machine automatically dials and connects.
7. As soon as the franking machine connects, the PBP balance screen appears.
8. Select “No” to skip adding funds.
9. The machine then checks for the download and installs the missing graphics.
10. When the update finishes, follow the prompts until you return to the main screen. All errors should be resolved.
Issue
Your franking machine displays one of the following error codes indicating that your franking machine is missing rates: 110c, 1103, 11DA, 1109
Cause
Your franking machine is missing rates.
Resolution
1. Ensure the franking machine is connected to either your network if using a wired or wireless connection, your PC if using PC meter connect or an analogue phone line.
2. Remove the power lead and wait ten seconds. The display shuts down.
3. Next, replace the power lead.
4. Once the franking machine initialises, press the “Refill Postage” button.
5. Select “Check PbP Balance”.
6. The machine automatically dials and connects.
7. As soon as the franking machine connects, the PBP balance screen appears.
8. Select “No” to skip adding funds.
9. The machine then checks for the download and installs the new rates.
10. When the update finishes, follow the prompts until you return to the main screen. All errors should be resolved.
Issue
The message “Account Discrepancy xxxx had been spent without being recorded to the external memory” appears on your franking machine
Cause
“Account Discrepancy xxxx had been spent without being recorded to the external memory” message appears on your franking machine because you have franked the mail without selecting an account.
Resolution
To continue franking mail, you need to allocate the outstanding funds to one of the accounts on your franking machine.
1. Select “Make a Manual Transaction”.
2. Choose the appropriate option. The option you choose depends on your manual transaction needs.
– Account: Select this option to choose an account from the available accounts on your system. You can then run the manual transaction against this account.
– Class: Select this option to set the postage class.
– Postage: Select this option to set the total actual postage amount for the transaction.
– Chrg Amt: Select this option to set the total postage amount that you will be charging for the transaction. This is the actual postage amount plus any surcharges you may want to add. By default, this sets to the same postage as the actual postage amount.
– Piece Ct: Select this option so the manual transaction indicates the number of pieces of mail sent.
– Weight: Select this option to set the total weight of all the pieces of mail.
3. Once you have finished setting up your manual transaction, select “Done” to save your changes. The system will return to the Home Screen.
Issue
“Insert Memory Stick” and “External Memory Not Responding” messages on the franking machine.
Cause
– A problem with the USB memory stick that plugs into the rear of your franking machine.
– You have turned on InView accounting on your franking machine but are not using this feature.
Resolution
Solution 1: Check the USB memory stick
– Check to make sure the USB memory stick is plugged in correctly.
– If the USB memory stick is missing or obviously damaged, please use the Contact Us options below.
If the memory stick is ok but you still see the error messages, try Solution 2 if you are using InView and Solution 3 if you do not use InView.
Solution 2: You are using InView accounting and seeing these messages
1. Remove the power cord and wait ten seconds. The display shuts down.
2. Check the rear of your franking machine to ensure the USB memory stick is plugged in correctly.
3. Plug in the power cord again.
4. Wait for the franking machine to initialise and see if the error message is still showing.
If you still see the error messages, please contact us.
Solution 3: You do not use InView accounting and are seeing these messages
1. Press “Options”.
2. Select “Accts”.
3. Enter the supervisor password if you are prompted and select “OK” to continue.
4. Select “Account Type”: INVIEW/Budget Manager.
5. When prompted select “Turn Accounting Off”.
6. Press “Home” to return to the Home screen with no account displayed.
If you still see the error messages, please contact us.
Issue
Your franking machine is displaying one or more of the following error codes and is unable to print postage:
– 2544
– E2544
– 2540
– Meter disabled
– 011b
Cause
Your franking machine has experienced an internal error.
Resolution
Pressing the “Clear/Back” button may clear the message.
If the error does not clear, reboot the franking machine:
1. Unplug the power cord from the rear of the franking machine.
2. Wait one to three minutes.
3. Plug the power cord back in, ensuring that it is plugged directly into a wall outlet.
If you need further assistance, please contact us.
Issue
Your PC shows Windows Error 2809 when installing PC Meter Connect.
Cause
Error 2809 occurs when the drivers used to run PC Meter Connect are not being installed properly. This is normally due to anti-virus, windows firewall or some other type of security on the network.
Resolution
Please consult your IT team to complete the PC Meter Connect installation.
Issue
Your franking machine displays any system fault message that starts with the number 23. Some examples of these error codes are 2307, 2308 or 2309.
Cause
Your franking machine has detected an error with the print head.
Resolution
1. Turn the franking machine off by removing the power lead from the rear of the franking machine.
2. Wait 30 seconds.
3. Replace the power lead and wait for it to initialise.
If you need further assistance, please contact us.
Issue
Your franking machine displays System fault 2303 or 2309 and will not feed mail.
Cause
Your franking machine has detected an error with the print head.
Resolution
1. Turn the franking machine off by removing the power lead from the rear of the franking machine.
2. Wait 30 seconds.
3. Replace the power lead and wait for it to initialise.
If you need further assistance, please contact us.
Issue
The franking machine displays error code 46.
Cause
The franking machine has detected a software fault.
Resolution
1. Turn the franking machine off by removing the power lead from the rear of the franking machine.
2. Wait 30 seconds.
3. Replace the power lead and wait for it to initialise.
If you need further assistance, please contact us.
Issue
The franking machine displays the System Fault ‘FLASH NEEDS INIT’.
Cause
This issue is due to a software fault.
Resolution
1. Turn the franking machine off by removing the power lead from the rear of the franking machine.
2. Wait 30 seconds.
3. Replace the power lead and wait for it to initialise.
If you need further assistance, please contact us.
Issue
The franking machine displays error codes:
– 24A1
– 24A2
– 24A3
– 24A4
– 24A5
Cause
The franking machine has detected a software fault.
Resolution
1. Turn the franking machine off by removing the power lead from the rear of the franking machine.
2. Wait 30 seconds.
3. Replace the power lead and wait for it to initialise.
If you need further assistance, please contact us.
Issue
The franking machine shows “System Fault 2003” and will not print.
Cause
This issue is due to a software fault.
Resolution
1. Turn the franking machine off by removing the power lead from the rear of the franking machine.
2. Wait 30 seconds.
3. Replace the power lead and wait for it to initialise.
If you need further assistance, please contact us.
Issue
The franking machine displays error code Invalid software error 107.
Cause
The franking machine has detected a software fault.
Resolution
1. Turn the franking machine off by removing the power lead from the rear of the franking machine.
2. Wait 30 seconds.
3. Replace the power lead and wait for it to initialise.
If you need further assistance, please contact us.
Issue
The franking machine displays error codes 0810 or 081B.
Cause
The franking machine has experienced an internal error preventing normal operation.
Resolution
This error is always accompanied by another error.
Press the “C” or “Clear” key to clear the error., if the error does not clear right away please restart the franking machine.
Now search the other error message that appears.
If you need further assistance, please contact us.
The franking machine occasionally might show the following fault “Power Cycle – System Fault” which means your franking machine cannot make a connection to the data centre server. Fortunately it is easy to fix. Below you will be able to find out what this means and how to potentially resolve the issue.
1. Ensure the franking machine is turned off and remove both the power cable and the connection cable.
2. Plug the power cable back into the machine and reboot the franking machine. Wait until it is loaded without a connection.
3. Turn the franking machine back off and remove the power cable again until the machine is ‘dead’.
4. Plug both the connection and power cables back into the franking machine.
5. Turn the franking machine on.
This should resolve the Power Cycle – System Fault. If you are still facing issues use the contact details below.
Issue
The franking machine displays the message “Connection Due”, “Connection Required”, or “Data Upload Required”, and you cannot frank postage and run mail.
Cause
This message appears between the 1st five days of every month, prompting you to connect to the Data Centre to perform a Data Capture Audit.
Important: You must make a connection before your franking machine will allow you to continue processing mail. We recommend that you do this as soon as possible after seeing the message in order to avoid any disruption.
Resolution
Before you start, make certain that your system can connect with the Data Centre. You can make a connection for data capture to take place by:
1. Following the prompts on the franking machine’s screen (press “Enter” at the “Connection Required” or “Data Upload Required” prompt) and making a successful connection.
2. Successfully performing a balance enquiry (press the “Funds” or “Add Postage” key, then select “Check Balance”).
If the franking machine cannot connect and clear the error, check to ensure that you have an active connection. Reboot the franking machine and any communication devices, and reattempt the connection a few times, including at different times of the day.
If you need further assistance, please contact us.
Issue
The franking machine displays the message “Low Sector” and does not allow the Home screen to become visible.
Cause
One or more of the internal components of your franking machine fail to communicate with one another.
Resolution
Restart the franking machine. Follow these steps to restart safely:
1. Unplug the power cord from the rear of the franking machine.
2. Wait one to three minutes.
3. Plug the power cord back in, ensuring that it is plugged directly into a wall outlet.
Issue
The franking machine displays the message “Invalid Preset Settings” on power up or when loading a preset.
Cause
This error is displayed when the machine cannot load the Normal Preset (the franking machine’s default settings: Carrier, Class, Ad).
The error can relate to a scale issue. Or it might occur after a Royal Mail rate change, for example if a Class has now been removed by Royal Mail.
Resolution
To resolve this error, first, try re-seating the scale:
1. The franking machine will display three different options: select “Quit Presets”. You will be returned to the home screen.
2. Remove the scale from the top of the franking machine.
3. Replace the scale on top of the franking machine, ensuring that it is fitted properly and is level.
4. Press the “Normal Preset” key.
If the error returns, check the serial port setting:
1. Select “Load Partial Preset”.
2. Press “Menu”.
3. Select “Setup”.
4. Press “Page Down”.
5. Select “Serial Port”.
6. Select “Attached Scale”.
7. Press Custom Preset and select the desired custom preset, or Press Normal Preset.
If your issue is not resolved, the problem may be that one of the elements of your Normal Preset (most commonly used Class, Ad and/or Text Message) is no longer available or has not been selected properly. To resolve the issue, simply select a new Class and re-save the Normal Preset.
If you need further assistance, please contact us.
Issue
The franking machine displays the “Mail piece too long message” when feeding mail.
Cause
The franking machine detects a sensor fault.
Resolution
1. Turn the franking machine off by removing the power lead from the rear of the franking machine.
2. Use a compressed air duster to to spray along the mail path. This clears away any dust or debris that has built up over time.
3. Wait 30 seconds.
4. Replace the power lead.
5. Wait for the franking machine to initialise.
Issue
Your franking machine displays the message “No Dial Tone” when you perform tasks that require you to connect to the Data Centre, such as:
– Topping up funds and checking balance
– Downloading rates and updates
Cause
Your franking machine lost its connection to the Data Centre.
The “No Dial Tone” message is a generic message for all connection methods, even those connected digitally via a Smartlink device, Communication Device or PC Meter Connect.
Resolution
Solution 1: Check all physical connections to your franking machine, attached devices or PCs to ensure that nothing is unplugged or has come loose
– Check that all wires and cables are securely connected at both ends.
– If digitally connected, check that your internet (wired or wireless) connection appears to be connected and operational in your location.
– Check if other devices in your location also lost their internet connections. If they have, follow your normal procedures to re-establish your internet connection or contact your internet provider.
– Ensure that you do not have a phone line connected to your franking machine.
– If connected via telephone line, check that your phone line is working.
– Use a spare phone handset and plug into your analogue phone line to see if you hear a dial tone. If not, then contact your phone provider.
– If your issue has not been resolved, try Solution 2.
Solution 2: Reboot your franking machine
1. Remove the power cable from the back of the franking machine.
2. Wait 10 seconds,
3. Plug the power lead back in.
If rebooting your franking machine does not resolve your issue, please contact technical support.
Issue
Cover Open message displays on your franking machine.
Cause
Either a cover is open or a switch or sensor may be malfunctioning.
Resolution
Please start by ensuring all the covers are correctly closed and no debris is blocking the covers.
If you are still seeing the “cover open” message when the covers are correctly closed, please follow the steps below:
1. Power down your franking machine via the screen options or by removing the power cable. When removing the power cable, ensure the franking machine is not connecting or updating. This will be advised on the screen.
2. Open and close all covers ensuring there is nothing stopping the covers from closing correctly.
3. Replace the power cable (if required) and turn on your franking machine.
Issue
Your franking machine displays System Fault 1EFC when you turn it on.
Cause
System Fault 1EFC displays when Inview Accounting has been turned on but the franking machine is unable to detect the USB memory stick required.
Resolution
Solution 1
1. If you are using Inview Accounting on your franking machine, remove the power lead from the rear of the franking machine.
2. Then insert the USB memory stick provided with your franking machine into one of the available slots located on the rear of the machine.
3. If you already have the USB memory stick inserted, please try unplugging it and trying the other USB port.
4. Replace the power lead and you should find the issue is resolved.
Solution 2
If you do not use Inview Accounting and are seeing this error, it is likely Inview has been turned on accidentally. To turn Inview off:
1. Press “Options”.
2. Select “Turn Item On/Off”.
3. If the supervisor password is enabled, you will be prompted to enter it and select “OK” to continue.
4. Select “Accounting”.
5. When promoted, select “Turn Accounting OFF”.
6. Press “Home” to return to the home screen with no account displayed.
Issue
The franking machine displays “Clear Print Transport” and will not run mail.
Cause
A mail piece, label, or some debris is caught in the printer area.
Resolution
The print transport is the area that envelopes and labels pass through during printing. To clear the print transport:
1. Unplug the power cord from the back of the franking machine.
2. Wait one to three minutes.
3. Turn the jam release lever on the front of the machine 1/4 turn to the right (clockwise) to the released position (vertical).
4. Remove any visible paper fragments from the feed deck. Occasionally a tape strip will get caught in the rollers.
5. Using a can of non-flammable canned air, and working from the left side of the machine to the exit, blow onto the feed deck that the envelopes/tape sheets travel on. Note: Make sure to spend enough time in this step to ensure that dust and debris are removed.
6. Lift the feed deck back up into position and turn the transport release lever 1/4 turn anticlockwise to lock it.
7. Plug the power cord back in, ensuring that it is plugged directly into a wall outlet.
Issue
The franking machine displays the message “Urgent – Battery Low” and will not print mail.
Cause
One of the two internal batteries is running low and approaching end of life.
Resolution
The battery is part of the franking machine security device that protects your postage funds. If your battery is allowed to expire, you will lose this information.
Pressing the “Clear/Back” button may clear the message and allow you to run mail temporarily. If the error remains, reboot the franking machine:
1. Unplug the power cord.
2. Wait one to three minutes.
3. Plug the power cord back in, ensuring that it is plugged directly into a wall outlet.
If the battery message returns after restarting, contact customer support.